As a female, the hardest part of traveling abroad for me has been styling my hair without heat. For those of you who haven’t traveled abroad, bringing anything that heats up is not recommended, as heat can do crazy things when the voltage is converted. Even with dual voltage appliances or voltage converters, there’s a strong chance that using a heating appliance such as a curling or straightening iron will go badly for you. On my first trip abroad, my Chi straightening iron stopped working after the first day. On my second trip abroad, my Hot Tools curling iron got so overheated that it fried off a piece of my hair. On my third trip abroad, my Conair blow dryer blew out the entire floor of my hotel.
After those disasters, I decided to stop fighting it and travel without any heating appliances at all. I am normally addicted to my curling iron, so I was really nervous that I would be a frizzy, awful mess in every photo. The stakes were even higher because we actually had a photoshoot scheduled for our trip to Paris, so there was extra pressure for my hair to look good! To prepare for this, I sat down with Pinterest and started experimenting with some no-heat hairstyling. To my surprise, it ended up working out so well! My hair looked fabulous every day, I had lots of extra space in my bag, and I didn’t have to spend an hour every morning getting ready. Ever since that trip, I have sworn by no-heat hairstyling, and it has made my traveling life so much easier.
There are a lot of ways to style your hair without heat, but a lot of them depend on your hair type. If you’re one of those amazingly lucky girls with naturally curly or naturally straight hair, you’re in luck, because all you need is a little bit of product and you are good to go for the entire trip! If you’re like me and your hair is naturally a hot mess, then you’re going to need a little extra help.
PRODUCT
The first key to no-heat hairstyling is product. A good styling mousse, gel, or spray can help to keep the frizz out and the style in. Different products work for different people, and every hairstylist has their own preferences. My suggestion is to find a hairstyle blogger with similar natural hair texture as you have, and find out what works for them. If you’re not checking your luggage, then you’ll need to find product that is available in travel sizes, transfer the product to smaller bottles, or find a salon or Monoprix once you arrive here and purchase some product. I recommend an anti-frizz styling creme (I like Bumble & Bumble’s) and a flexible hold hairspray. I also bring a small spritzing bottle that I can fill with water to spray on dry hair just before styling, which helps to secure the curl in. Good hair pins are a must. I especially swear by Goody’s spin pins, which “screw” into your hair and hold buns and updos amazingly well. My mom also recently introduced me to these jumbo curved bobby pins, which are so strong and fit the curve of your head, making them great for larger or more complicated updos.
SOCK BUN
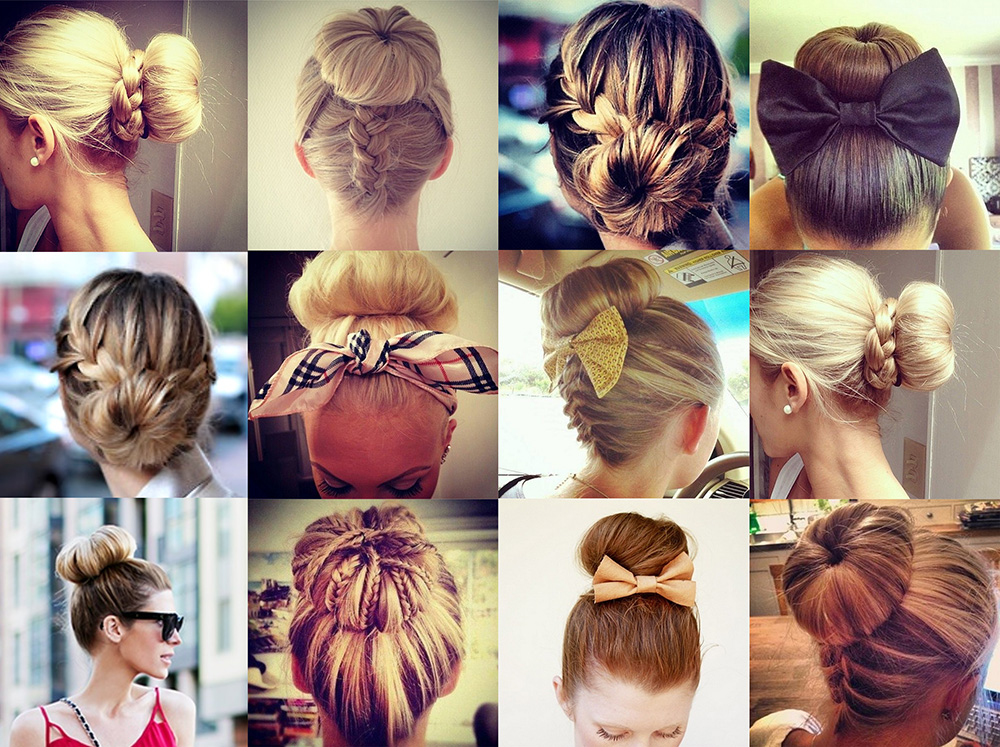
My favorite no-heat tool is the sock bun. I swear by this thing!!! On my last trip it was the only thing I used for curls, and it worked like a champ. To start, you need a hair mold. You can make your own sock bun mold by cutting the toe off of a sock and rolling it into a donut, but I prefer to use bun molds of various sizes, which you can purchase at H&M, Claire’s, or Amazon. The coolest thing about a sock bun is that you can either wear the bun mold in your hair for a super cute updo, or you can put it in slightly damp hair before going to bed and wake up with beautiful curls that will last all day!
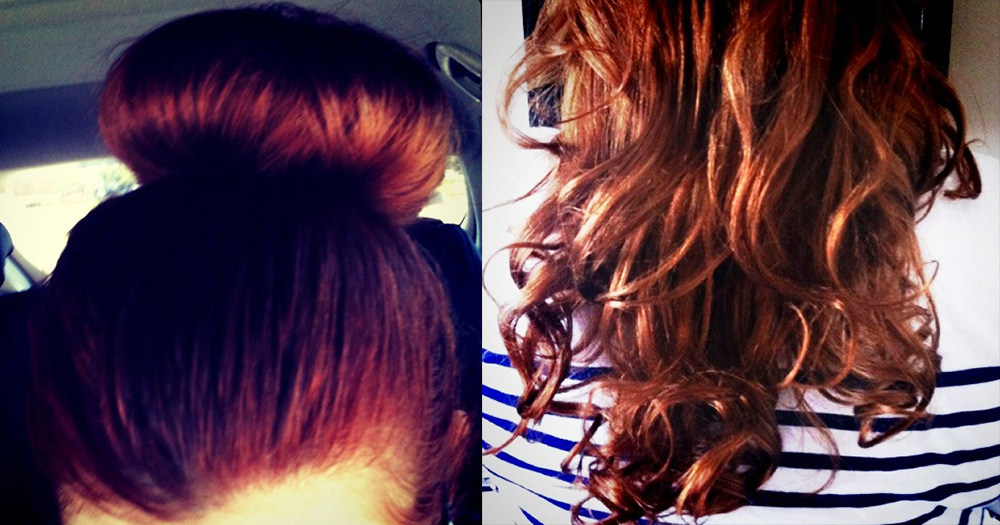
The above photos show my hair in the sock bun, as well as the morning-after sock bun curls.
Sock bun molds come in various sizes, shapes, and colors, so you can buy or create different molds to get different looks. When wearing it in a bun, I really like the molds that already have fake hair on them, which are really great for girls with thin hair or for those who have a hard time getting their hair to be perfectly smooth on the mold. For extra fancy events, I love the extra large molds, which look so chic and couture on tight, slicked back ponytails. When using the mold for curls, I prefer the small molds, which result in a tighter curl that loosens up a bit throughout the day. Putting the bun in your hair can require some practice, but I promise, it’s not hard! There are a lot of great YouTube tutorial videos on how to do it, but I really like this one. My thought process watching her roll her bun went from “Oh this looks messy, she’s going to have to start over” to “Wow, that turned out great!” That’s often my thought process when doing my own buns, so don’t be too hard on yourself when practicing. Once the bun is in it’s pretty easy to smooth it out and pin back stray hairs for a more polished look. I also really love to accessorize by sock buns with my two favorite things – braids and bows!
GIBSON ROLL
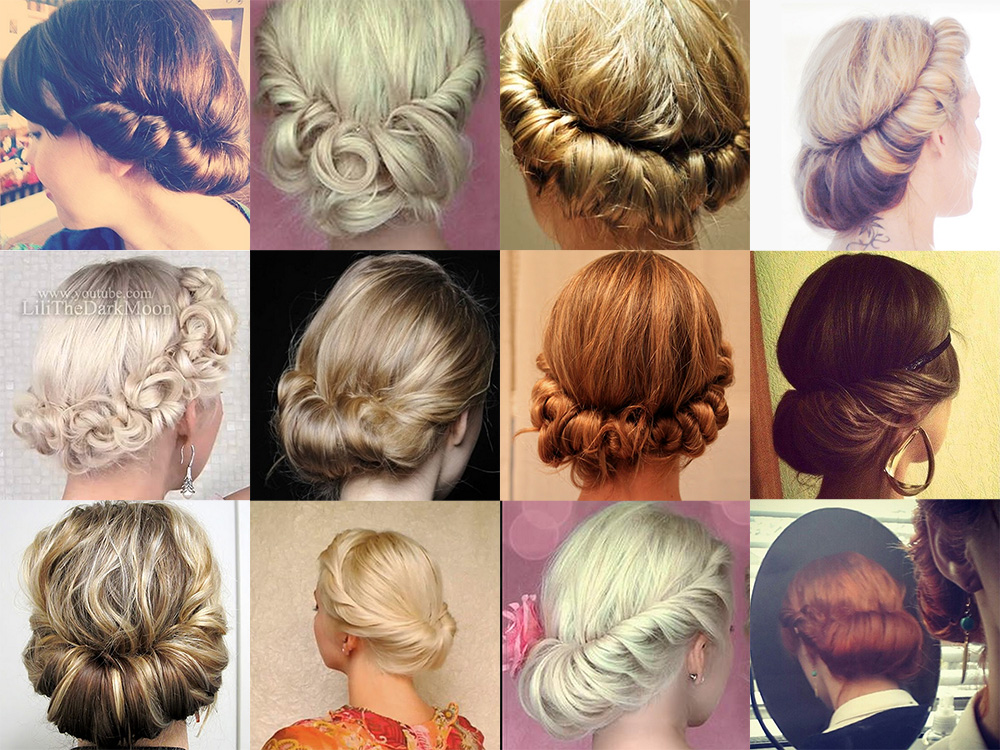
This is one I have recently been turned on to, and I think it is just so classy and elegant. Plus it results in a beautiful curl when done with damp hair! It’s a bit more difficult than the sock bun, but after a little practice it’s quick and easy and will get you a ton of compliments. To do this one, it’s easiest to start with a simple elastic headband. You can buy them everywhere, but I really like the soft, multicolored ones from this Etsy shop. Make sure you get one that you can wear comfortably for several hours. Some of the smaller or tighter ones can cause headaches after awhile, which is no good! Secure the elastic with bobby pins and start with a small section on the side of your head. Begin twisting and curling your hair up around and through the headband, adding hair to the section as you go. If you need a visual example, I really like this tutorial as well as this one. If you don’t like headbands, you can also use a Gibson Roll hair mold, which will help you keep the shape without the headband.
BRAIDS
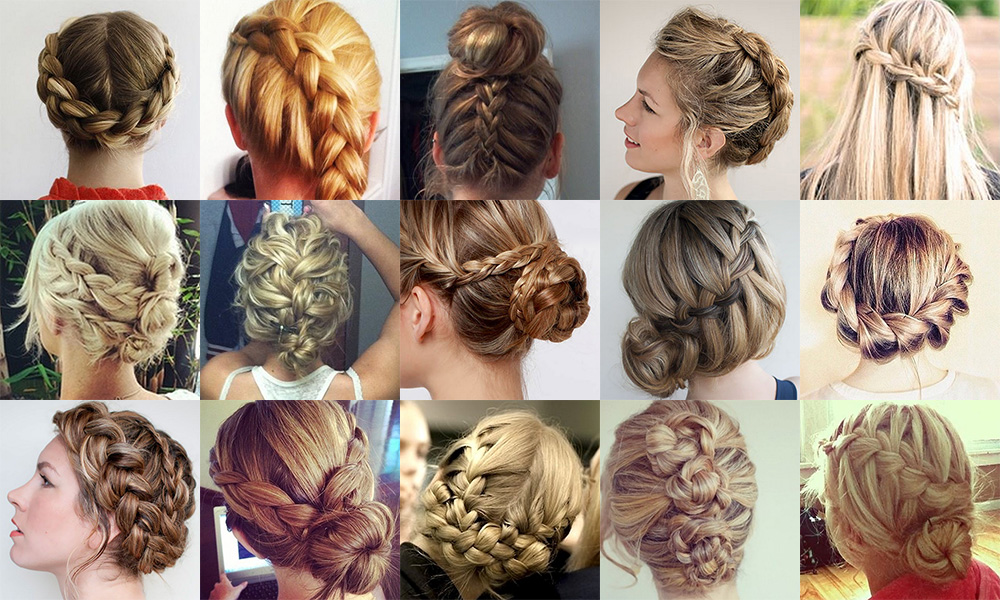
I am a total sucker for a good braid. My favorite Instagram account is Instabraid, where they feature adorable new braided hairstyle every day. If you’re not able to French braid your own hair, teach yourself! It’s so, so easy, and it is the perfect go-to hairstyle when your hair is dirty, frizzy, or you just don’t have the time or tools to style it. Best of all, there are literally thousands of different ways to braid your hair, so you can sport a different look every day of the week and wow your friends with your styling prowess. My go-to favorite on a bad hair day is the halo braid. It’s so much easier than it looks, I promise! There are a lot of different ways to do this, but here is my preferred method: Flip your head over and start with a small patch of hair just below your ear. Begin to braid the hair, adding small pieces as you go, and staying near the hairline. Follow the braid all the way around until you reach the base of the other ear, then finish the braid normally. Pull the braid as well as the rest of your unbraided hair into a sony ponytail (on the same side of your head that you started the braid on – this will hide the starting section). You can either leave the ponytail, or put it into a sock bun, or continue the braid, or braid it and then twist it into a bun. If you’re especially dextrous, you can continue the braid in a spiral around the back of your head. On other days I really love a basic French braid into a bun (this one also looks great upside down, starting the braid at the base of your neck), the three braid bun (alternate vertical version here), and the messy braid (this one works best if you have hair extensions to add thickness and length to your braid).
To get started in the wonderful world of braiding, the key is to really know how to French braid your own hair. Once you have mastered this (don’t worry, it won’t take more than a few attempts to get the hang of it!), you can start experimenting with different looks. It’s also helpful to know how to fluff a braid to make it fuller (very simple, it just involves gently tugging on the outer sections to give them some volume) and how to make a good bun out of a braid (for me, the key was to keep it loose and use a lot of bobby pins and spiral pins to secure it). Another bonus of braiding is that when you take out the braid, you usually have a beautiful wave for the next day or two!
There are so many possible updo options and lots of different no-heat curl techniques, but these are the ones that have worked for me. These techniques have been a lifesaver for me during my travels, and have allowed me to leave the tools at home and spend less time primping in the morning, so that I can spend more time exploring Paris! If you have any no-heat hairstyling tricks that have worked for you, or any other advice regarding styling your hair while traveling, let me know in the comments!


Ryann SwanLove me a good braid!
Fabulous blog and so glad I stumbled on it – I head to Paris on Tuesday for 3 weeks and your tips and suggestions are perfect!
ElissaStacy! These hair tips are so amazing. I love the Gibson roll… I’d seen that style before but didn’t know what it was called, and now I’m definitely going to try it out. Thanks for making this awesome post!!
TriciaThanks so much for this article! It’s too hot to leave my massive hair down so these are some gorgeous alternatives. Thank you!
Travel Tips: Packing for France » L'Amour de Paris || Romantic Parisian Portraits in the City of Love[…] ruining your favorite Chi, consider no-heat curling methods suck as the sock bun or headband curl (see our how-to post on no heat hairstyling here), or pick up an inexpensive curling iron once you get into town (Monoprix and BHV will have plenty […]
Travel Tips: Packing for Paris, Summer Edition » L'Amour de Paris || Romantic Parisian Portraits in the City of Love[…] favorite Chi, consider no-heat curling methods suck as the braid, the sock bun or the Gibson roll (see our how-to post on no heat hairstyling here), or pick up an inexpensive curling iron once you get into town (Monoprix and BHV will have plenty […]
SuzieWhat if you hair isn”t long enough to do braids and buns?
stacyTo be honest I have never had short hair so I have no idea what the styling is like! If you’re talking shoulder length, you should still be able to do most braids and some of the buns such as the Gibson roll. If your hair is super short, then I would think a little product to add smoothness and texture would give you a great relaxed, tousled look that should be simple and easy.
Headband Curls {Gibson Roll} | Nothing Fancy.[…] leave it overnight, for a few hours, or even keep your hair wrapped for a fun Gibson Roll, as L’amour de Paris calls it. <a […]
Travel Tips: Europe Packing Guide, Accessories Edition » L'Amour de Paris || Romantic Parisian Portraits in the City of Love[…] fry your hair, and possibly damage the wiring in your building. Instead, opt for some of the no-heat hairstyling tips in this post. Most hotels and rental apartments will provide a blow dryer. Laptop – Unless you know you […]